Tribe 17 - Rig IK Legs

A minor setback, in that I had to edit the original rigs to include IK handles for the legs and feet. Learning from this mistake, I understand a lot more than I originally did with rigging and the use of IK handles. It will make life much easier when animating - which I'll be concentrating all my efforts to.


Displacement + Final Gathering + Global Illumination

Here we have explored the use of Displacement, Final Gathering and Global Illumination with Maya and Mental Ray.

Displacement
Displacement maps can add additional detail to basic geometry. Where black areas of the map are 'lowered' and white areas are 'raised' off the object mesh, 'Mid-Greys' are the baseline value where no displacement will occur.


For displacement maps to work properly, its important to determine the Mid-Grey value of the map by adjusting the 'Alpha Gain' and 'Alpha Offset' accordingly.


Below are further examples of displacement, using a non-subdivision setup for unsmoothed objects, a subdivision setup for smoothed surfaces as well as a nurb surface displacement.


Final Gathering
Final Gather works by projecting 'Final Gather Rays' into a scene which scatter upon contact of an object's surface. This effectively calculates 'bounced light and colour' which can be used to light a scene independently or in conjunction with Global Illumination.


Global Illumination
Global Illumination makes use of the photons being projected into a scene. The photons are absorbed and reflected throughout the scene where colour inheritance can occur to bounce or bleed as it moves between different surfaces and their respective material. As such, global illumination can mimic real-world lighting conditions as the photons carries wavelengths of the colour spectrum. Final Gather can also be used to smooth the photons out.

Maya Dynamics #07

Here we explored how to control animation cycles with instancing particles. In the scenarios below, the animation cycle is offset for each instance while working with the scene; the robot's feet matches contact with the ground, as well as the spiders following the curvature of the nurb surface.


Environment + Blocking Animation

Apologises for the slow update, I've been working away getting my scene set up, reading up some animation techniques and resources (see at end of post); and embarking on some first steps of animation myself.

To reiterate, the members of Tribe 17 are performing a ritual amidst a junkyard to attract nature's fireflies which in turn power them. Tribe character A, being a 'witch doctor' figure, leads the ritual and will be the focus of animation. Character B will manually operating the pile driver, striking the junk to create sparks that attract the fireflies; where character C will form the makeup of worshippers and perhaps even a drumming accompaniment. And ideally, at the very end we will see a lone firefly enter some parts of junk to awaken a new 'junk' tribesman to the group.

Here is the setup of the scene where the animation will take place. There will be a number of establishing shots, which will cut to close ups of animation matching with the sound. I also intend to have some duplicates of the secondary characters B and C to help populate the scene, which slight variation should be simple enough to add to the models if necessary.


I've begun experimenting with the secondary animated characters B and C first to build up my confidence for the main character of animation, where I've started by blocking some of their key poses before animating fully. The first is pulling the rope to operate the pile driver, and the second is kneeling with some worshipping type motions. As such, its pretty rough as the keys are simply stepped at the moment moving from pose to pose.


Once I have more blocked/animated parts done, I will be able to start cutting clips together into a previs form to match with the original track of Soundscape 17.

Whilst establishing my scene and getting my hands stuck into the animating, I've also been looking at some resources to help me on my way. The 11 Second Club has some great resources on their site, particularly the 'Helpful Hints' section hosting a number of great guides when it comes to animating - so be sure to check them out.

I'm still reading through them, but some I found a good read so far are:

The Top Five
Why We Block
Back and Forth
Put It There
Giving Yourself Permission

Motion Blur + Depth of Field

Here we have explored the use of Motion blur and Depth of Field within Maya Software and Mental Ray.

Motion Blur

Motion blur can be useful in adding to the believability of movement as demonstrated with the jet planes below.


However, it can significantly increase render times and should thus only be used when appropriate to the scene. The image below demonstrates the difference between Maya Software motion blur to Mental Ray's motion blur, with the latter added another minute to fully render. Switching from 'Scanline' to 'Rapid Motion' (rasterizer) in Mental Ray can help reduce render time while keeping desirable results.


Depth of Field

Depth of field can be achieved with Maya's cameras to simulate real-world cameras in focusing on specific subjects. Again, this increases overall render time where Zdepth render layers could be used instead to simulate depth of field in compositing.


Maya Dynamics #06

Delving further into the use of instancing with dynamics, here we've looked at creating variation within the particle instances with rotation, scale and aiming expressions; to emitting particles from instances themselves, to populating a scene with trees using instances of paint effects.


Tribe 17 - Rigged + Controls

The members of Tribe 17 are now fully rigged with working controls. It took a little doing to get things moving as intended, most parts are parented to joints although a few specific areas had to be skinned.


Now the animating can begin in earnest!

Mental Ray

Here we are delving deeper in rendering with Mental Ray, understanding some of the differences and limitations between Maya Software rendering and Mental Ray, to optimising scene files to ensure best possible render times.


Shadows - Shadow Map
Depth Map Shadows from Maya Software does not function with Mental Ray, however, these can be 'transferred' into a similar representation using Mental Ray's Shadow Map overrides if needed.

Below, the first of the two images show Software Rendering with Depth Map Shadows, with the second demonstrating Mental Ray using its own Shadow Map overrides transferred from the original depth map shadows.


Optimising - Binary Space Partition (BSP)

To optimise scene files and minimise render times, adjusting and noting the BSP Depth can help reduce render times by balancing the BSP Size (Size of Memory Leaf) with the BSP Depth (Depth of Memory Used). In addition, Raytracing settings and sampling values can be reduced to greatly reduce rendering times with little impact on the scene as a whole.

The images below demonstrate the changes in render time from Metal Rays default production settings to a few minor adjustments as described above; making around a 20 second difference, with only a very subtle difference in image quality.


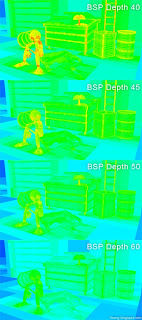
Examining the BSP Depth further can be achieved using 'Regular BSP' with 'Depth' diagnostics. Red areas signify High areas of memory usage, with Greens/blues signifying low.


Much of this Optimising process depends on the scene itself requiring some specific tweaking for each individual scenes, where its benefits will certainly pay off by reducing render times when rendering full animation sequences.

Note: For some reason, I couldn't get the Output Window to display the BSP reports despite changing the Verbosity Level to 'Progress Messages' in Maya 2011. Information about the render would appear as normal when rendering in the output box, but lines concerning BSP data was simply missing. I ended up using Maya 2010 which functioned fine by reporting the BSP data as normal.

Maya Dynamics #05

Today, we looked at the use of instancing with Maya dynamics. One can already begin to see the potential that instancing with dynamics can have, populating scenes with multiple objects quickly and efficiently.


Tribe Character Model C

Third character model complete! Again, areas were changed when translating the original design in order for the model to function better in a 3D space.


Front, Side, Back.


With the three character models complete, I hope to get them rigged up as soon as possible in order to begin some much eagerly awaited animation.

Tribe Character Model A - Edits

Made some minor tweaks to Tribe character model A, heightening the legs slightly and adjusting the feet.

Tribe Character Model B

Second character model is complete! Had a bit more difficulty figuring out the various parts for this one. I had to change a few more areas from the original design to work better in a 3D space, but it hopefully it still captures the essence of the character as before.


Front, Side, Back