Update on the progress with dynamics over the key sequences of the animation, created using Maya dynamics and post compositing in After Effects. Each dynamic element has to be rendered out separately for optimal control in post compositing, where the environment itself may still look at little rough as they were not rendered at this stage. Some further tweaking and refinements is still necessary as their not quite there yet.
Evil Wolf Dynamics Test
The dynamics are mainly following their influence from the initial concept here. Movements of the dynamics need to be sharper to better reflect the nature of the evil wolf.
Good Wolf Dynamics Test
Following the concepts from here. The markings are being generated randomly with instancing objects, although I'm considering to animate the markings manually for better control (or perhaps a combination of the two). Tweaking to the density of the purple lights may also be in order.
Shrine Dynamics Test
There will need to be two sets of dynamics for when the shrine; one where it is relatively dormant during the opening, to another with a rushing of activity as it beckons the wolves to the soul. The above example is admittedly not quite one or the other as of yet, serving as an experimentation of ideas with ethereal like flames to swirling trails of energy.
Showing posts with label Maya. Show all posts
Showing posts with label Maya. Show all posts
Shrine Opening Test #2
Revisions to the shrine opening, with increased speed and acceleration. Still toying with the idea of the fade to black during the narrator's dialogue as you can see in the 4th variation.
Some minor tweaks to the positioning of the rock formations is needed to stop the slight 'popping' towards the end of the pull back.
Some minor tweaks to the positioning of the rock formations is needed to stop the slight 'popping' towards the end of the pull back.
Leave a comment:
2
comments

Shrine Opening Test
One of the trickiest environments to tackle is the transition shot from the shrine where the camera pulls back through the environment. Here is a playblast of the scene focusing on the camera movements, with two minor variations in the editing. Elements such as lighting is not final.
We are yet to determine the idea of cutting to one or two shots of the wolves with the slow panning of the soul and narration, for a sense of tension/buildup before the race. Feedback is most welcome.
We are yet to determine the idea of cutting to one or two shots of the wolves with the slow panning of the soul and narration, for a sense of tension/buildup before the race. Feedback is most welcome.
Leave a comment:
0
comments
Environment Update
Update on progress with environments The Wolves Within - these are framed closely to the camera angles found in the animatic/previs.
Above Shot & 'Take Lead' shot
We first see the wolves from above, before leading to a side by side shot of the two wolves running where the evil wolf edges in front.

Evil Wolf Paw Shot

Shot of the evil wolf demonstrating his power as he crushes the ground beneath him to gain the lead. Again, the green light is a placeholder at the moment until some more development tests.
This leads on to the main Evil Wolf shot which has undergone some further tweaks.

Side Race Shot

Side race shot where the good wolf catches up by taking alternate route.
Jumping Shot

Jumping shot as the good wolf begins to take the lead. This leads into the 'Air shot' of the good wolf. Elements of the affects of the good wolf should begin to present here (will be added).
Landing Shot

Landing shot showing that the good wolf has taken the lead. Bit tricky to capture the composition in this one as the good wolf needs posing to fit into the shot correctly. Remnants of the effects of the good wolf such as the purple/pink light and markings will be added.
Above Shot & 'Take Lead' shot
We first see the wolves from above, before leading to a side by side shot of the two wolves running where the evil wolf edges in front.


Evil Wolf Paw Shot

Shot of the evil wolf demonstrating his power as he crushes the ground beneath him to gain the lead. Again, the green light is a placeholder at the moment until some more development tests.
This leads on to the main Evil Wolf shot which has undergone some further tweaks.

Side Race Shot

Side race shot where the good wolf catches up by taking alternate route.
Jumping Shot

Jumping shot as the good wolf begins to take the lead. This leads into the 'Air shot' of the good wolf. Elements of the affects of the good wolf should begin to present here (will be added).
Landing Shot

Landing shot showing that the good wolf has taken the lead. Bit tricky to capture the composition in this one as the good wolf needs posing to fit into the shot correctly. Remnants of the effects of the good wolf such as the purple/pink light and markings will be added.
Leave a comment:
0
comments
R&D: Shrine Dynamics #1
With the wolves affecting the environment in fantastical ways, dynamics are an important element for our animation. This can be achieved with a combination of Maya dynamics and post effects, or just post composition effects alone.
Here are some initial render tests with Maya dynamics for the Shrine Environment. The soul is suspended in mid-air over the central shrine which reacts strongly to the wolves' presence.
Raw Maya Particles
Post-Comp
The post effects gives a much needed boost to the basic dynamics, which will most likely be the best way to approach this process. It's still a little rough at the moment and will probably go through many more tests and variations, as elements such as lighting from the particles will need to affect the environment (current render is a single background plate).
Leave a comment:
0
comments
Good/Evil Shot Environment
Making progress with some of the other environments/shots at The Wolves Within, with modelling, texturing and lighting. Here are the central shots where the Good and Evil wolf get to demonstrate their affects on the environment. Forgive the wolf poses in each shot - as I don't have the rigged versions yet, they are primarily there to achieve the correct scale in the environment.
Evil Wolf Shot

Here the evil wolf takes the lead, mainly bringing destruction to the environment. Ominous green shafts of light seep through the cracks on the ground, where shards of rock and angular rock formations fill the scene. Original concept here.
Good Wolf 'Air' Shot

In this shot, the good wolf is leaping in the air as he regains the lead from the evil wolf. Elements in the environment echo ideas from the original concept, with the Native American markings being awakened by the presence of the good wolf, as well as the shards and fragments of the rocks coming down to form as a whole.
Markings

There's still a few placeholder elements until some further testing with dynamics can be carried out, namely the green light from the evil wolf environment and the pinky/purple light from good wolf environment.
It's a little tricky working with each environment, as definitive right or wrong elements is hard to pinpoint until a more refined shot of the environment is done. Only until you you have a more refined scene, can you see the broader picture and identify what is needed next.
Leave a comment:
1 comments
Shrine Environment #03
A lot of experimenting with textures and Normal Maps this week, while making more progress with the shrine environment. Textures have been applied throughtout the environment along with additional adjustments to the lighting.

Shrine Model with Normal Map

Totem Models


The base models of the totems was taken into Zbrush, polypainted (painted directly onto the model rather than a flat texture map) and scuplted for additional details. From this, normals maps and texture maps from polypaint can be exported and applied to the base mesh.
Leave a comment:
0
comments
Shrine Environment #02
More progress with the shrine environment over at The Wolves Within, experimenting with the lighting in the scene to get a sense of the tone we're trying to capture. Elements such as the background matte painting and blue shaft of light are temporary at the moment and will be further refined.


Leave a comment:
0
comments
Shrine Environment #01
Work in progress for the Shrine environment, blocking things in at the moment and will continue to add further detail. A few experiments will be needed to be carried out involving textures with normal maps and the background matte painting.


Main totem props


Main totem props

Leave a comment:
0
comments
Hi-Res Model - Body
With the head complete, we have begun to model the body of the hi-res version of the character.


Front, Side, Back.


Front, Side, Back.


Leave a comment:
0
comments
Hi-Res Model - Head
Remember this guy? Well, we've now got round to modelling a hi-res version of the character. Where there were limitations to the earlier games model, it is now a case of maximising detail when necessary, adding additional faces that will be eventually smoothed. Of course, the flow of geometry is still important and must be considered carefully.


Front, Side, Back.


Front, Side, Back.


Leave a comment:
0
comments
Maya - Matchmoving #2 - 4
Continuing our matchmoving workshops, we've begun to track some live scenes using Autodesk's Matchmover. Essentially, the camera tracking data is translated from Matchmover to Maya, allowing one to construct proxy environment and place new objects into the scene with the confidence that it will appear correctly in shot.
We experimented with a number of methods from:
Autotracking (added sphere)
to manual tracking method known as Target Tracking (added sphere)
to a Masked Auto Tracking method, requiring one to maintain the mask throughout the scene (added wind-up Key).
We experimented with a number of methods from:
Autotracking (added sphere)
to manual tracking method known as Target Tracking (added sphere)
to a Masked Auto Tracking method, requiring one to maintain the mask throughout the scene (added wind-up Key).
Leave a comment:
0
comments
Maya Dynamics #10 - 12
Been keeping up with some Maya tutorials in the background, starting with some dynamics!
Soft/Rigid Bodies
Some more dynamics with soft/rigid bodies, creating a number of interesting effects from deformations to organic type movements.
Dynamics Ncloth
Dynamics can also be applied to nurb objects, granting some advantages over polygon counterparts.
Soft/Rigid Bodies
Some more dynamics with soft/rigid bodies, creating a number of interesting effects from deformations to organic type movements.
Dynamics Ncloth
Dynamics can also be applied to nurb objects, granting some advantages over polygon counterparts.
Leave a comment:
0
comments
Maya - Matchmoving
In this workshop, we're beginning to look into the process of matchmoving with Maya - effectively blending live-action scenes with CG elements.
Here, we took a static image as a starting point. Without any prior information to the actual image or focal length settings, aligning the camera is a tricky yet integral part of the process.

Modelled Set
Once the camera is aligned, elements in the scene had to be modelled in order to achieve correct information with lighting, shadows and reflections. We then proceeded to add our CG element to the scene, an orrery, as well as some random spheres to test elements within our set such as the shadows and reflections.

Final Composite
After rendering out several passes (shown below), the shot is composited together to form the final scene. Note the integration of the orrery to the scene, the shadows on the sphere under the walkway, as well as the reflection to the far right sphere towards the back.

Various render passes
By rendering out different elements of the shot separately, these can then be effectively controlled and composited within the scene by adjusting any individual values. These were rendered out with render layers, and later composited in After Effects.


This ends the beginning introduction to matchmoving, where I believe we will continue by dealing with moving elements in the next workshop.
Leave a comment:
0
comments
Maya Dynamics #09
Some more dynamics before the holidays, introducing soft/rigid bodies with a few scenarios; a chain, Newton's cradle, earring and catapult.
I tried increasing the gravity magnitude setting as it seems to work better in creating less floaty movements, though in hindsight I think I could have pushed it more for some of them. Newton's cradle also took some tinkering to get right, as it seemed to have a mind of own when the balls struck one another. Other than that - it was an amusing case of trial and error to get the catapult to hit its target.
I tried increasing the gravity magnitude setting as it seems to work better in creating less floaty movements, though in hindsight I think I could have pushed it more for some of them. Newton's cradle also took some tinkering to get right, as it seemed to have a mind of own when the balls struck one another. Other than that - it was an amusing case of trial and error to get the catapult to hit its target.
Leave a comment:
0
comments
Turntables for Tribe 17
Got round to creating turntables for the main three characters of Tribe 17, with Tribe A, B and C. Unfortunately, the latter two videos are not in HD yet (as vimeo only allows 1 HD video a week), but they will become HD sometime later in the next week or so.
Leave a comment:
1 comments
Mental Ray - Caustics, Materials, Physical Sun, Portal Lights, HDRI
A lengthy post coming up - looking at Mental Ray with Caustics, Materials, Physical Sun and Sky, Portal Lights and HDR images.
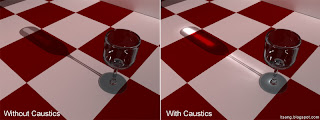
Caustics
Caustics is the name given to the phenomenon of bright hot spots when light is refracted through materials such as glass or water. In this case, applying the caustic setting (along with final gather and global illumination) helps to simulate this effect.
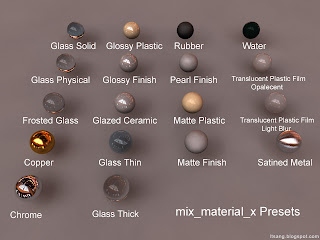
Mix_Materials_X
Mental Rays default mix_materials_x has a number of preset settings that work quite effectively. The versatility of the material is impressive especially considering the fact that these presets can be combined and mixed together for entirely unique results.
Physical Sun and Sky
Mental Ray has the option of using a Physical Sun and sky to light a scene - here we delve into some of the finer settings.
With a default sun and sky, the horizon line must be adjusted to match the scene.

Adjusting the physical sun direction will simulate different times of day, where the sun disc scale attribute can be tweaked to change the size of the sun.
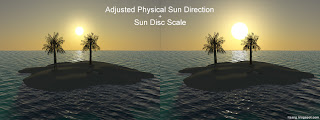
A early afternoon lighting is achieved by rotating the sun by a rough value of 135.
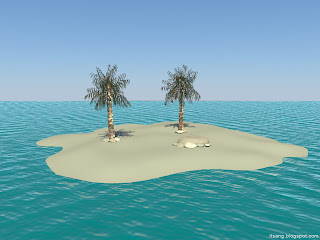
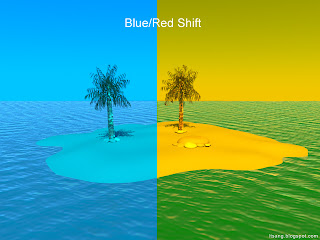
If necessary, the hue to red/blue can be tweaked to match specific scenes.
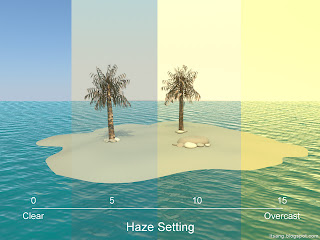
Where the haze setting can be adjusted to create a clear day or an overcast one.
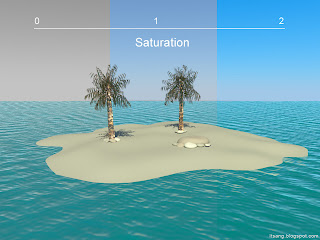
Saturation levels can also be tweaked to a desired effect.
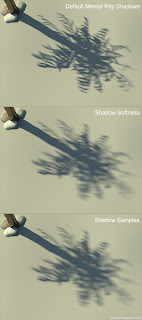
Shadows created by the physical sun and sky can also be tweaked. With the example below, increasing the softness and number of samples can help achieve a softer look to shadows while maintaining quality.
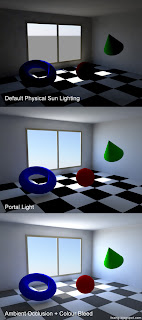
Portal Lights
Mental Ray's physical sun and sky do not work so well with interiors. However, this can be amended with the use of portal lights to help light any interior scenes. As such, ambient occlusion and colour bleed can be used to have colour bounce of surfaces.
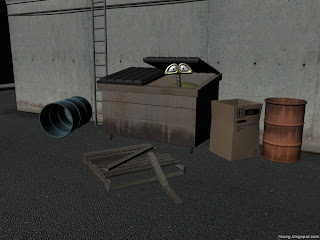
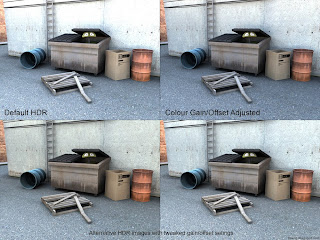
HDR (High Dynamic Range) Images
HDR images used for lighting can provide a much greater level of detail to a scene, particularly with reflective surfaces. Often, it alludes to the world outside the scene with a chrome ball type reflection.
Base scene
Tweaking colour gain and offset values is integral to achieve desired results when using HDR images. While it may not be noticeable in the examples below, different HDR images were used to experiment with gain and offset values.
Caustics
Caustics is the name given to the phenomenon of bright hot spots when light is refracted through materials such as glass or water. In this case, applying the caustic setting (along with final gather and global illumination) helps to simulate this effect.

Mix_Materials_X
Mental Rays default mix_materials_x has a number of preset settings that work quite effectively. The versatility of the material is impressive especially considering the fact that these presets can be combined and mixed together for entirely unique results.

Physical Sun and Sky
Mental Ray has the option of using a Physical Sun and sky to light a scene - here we delve into some of the finer settings.
With a default sun and sky, the horizon line must be adjusted to match the scene.

Adjusting the physical sun direction will simulate different times of day, where the sun disc scale attribute can be tweaked to change the size of the sun.

A early afternoon lighting is achieved by rotating the sun by a rough value of 135.

If necessary, the hue to red/blue can be tweaked to match specific scenes.

Where the haze setting can be adjusted to create a clear day or an overcast one.

Saturation levels can also be tweaked to a desired effect.

Shadows created by the physical sun and sky can also be tweaked. With the example below, increasing the softness and number of samples can help achieve a softer look to shadows while maintaining quality.

Portal Lights
Mental Ray's physical sun and sky do not work so well with interiors. However, this can be amended with the use of portal lights to help light any interior scenes. As such, ambient occlusion and colour bleed can be used to have colour bounce of surfaces.

HDR (High Dynamic Range) Images
HDR images used for lighting can provide a much greater level of detail to a scene, particularly with reflective surfaces. Often, it alludes to the world outside the scene with a chrome ball type reflection.
Base scene

Tweaking colour gain and offset values is integral to achieve desired results when using HDR images. While it may not be noticeable in the examples below, different HDR images were used to experiment with gain and offset values.

Leave a comment:
4
comments
Subscribe to:
Posts (Atom)


