Nexus - Day 3

A small update at my day at Nexus - I've begun some work on some environments for an upcoming pitch, which I'm very excited about but unfortunately can't say too much on here.

Today also signals the end of the first week here at Nexus (cut short by the big royal day tomorrow). Its been a captivating week as I've met the team, familiarised myself at the studio and learnt some new software with 3D Studio Max. Its all still fresh and inspiring so far - where I can't wait to get stuck in in earnest with some meaty projects.


On a side note: You may want to be on the look out for 3D Artist magazine issue 28, as it features a double page article on the CG Arts & Animation course at UCA Rochester. It also features my Dark Carnival piece from the 1st year, along with some words I mention at the beginning of the second paragraph. Otherwise, there's some great stuff on the legendary Syd Mead too.

Nexus - Day 2

Continuing with some 3D Studio Max tutorials, I got round to finishing my toycar model; learning how to lay out UVs, texturing, lighting and rendering with Vray and HDR maps in Max. Again, its a similar process to Maya with things more or less hidden under different menus and commands. The Vray lighting system is certainly worth some more investigation as it produced some neat results even with my simple lighting setup.

The final render could do with some minor tweaks, though I'm pleased with the results so far. I ended up giving it a copper type texture where I tried to up the specular and bump settings for better results.


UVs


Moreover, I also got the chance to check out the workflow and structure of Nexus in how they manage and organise their range of projects across a vast network of computers. All in all, it stresses the importance of having naming conventions and sticking to a pipeline to ensure that projects run smoothly, as any number of projects could be going on simultaneously with several people working on each collaboratively. It sort of reminds me of our group project earlier on in the year, where specific attention was needed in simply organising a working structure that we all agreed to adhere to.

Nexus Productions - Work Placement

Nexus Productions is an independent Production and Animation Studio based in London. They work in a variety of fields from short films, commercials to interactive media; from which they have achieved world wide recognition in the form of an Oscar nominated short, Grammy nominated and MTV Award winning music videos, Cannes Grand Prix, Gold Lions, and Black D&AD pencil winning commercials.

Here are a few examples of their work.


Muffin Man
Commercial
A fully animated spot taking the viewer through the runaway expansion of a muffin making business from a small stall to international franchise. This was actually shown to us last year when Mark Davies came to give a talk.


Mr Long Legs
Commercial
A feel-good spot for Royal Bank of Canada, which follows Mr Long Legs as he takes his kids on an adventure around the World.


The Girl Effect
Commercial
Some 2D stuff, this short takes us on the journey of a 12 year-old girl to escape poverty, exploitation and the risk of AIDS/HIV, to build a better future for herself and future generations. The Girl Effect is the potential of 600 million adolescent girls to end poverty for themselves and the world.


The Tale of the Three Brothers (Harry Potter)
Film & TV
Inspired by oriental shadow puppetry, the captivating sequence visually narrates Hermione's story about three wizard brothers who try to outwit Death. I believe Nexus prodimantly worked on the 'second brother's tale' of the scene.


Browser Pong
Interactive


I also wanted to show some of the interactive pieces that Nexus does, as I was shown a great example the other day. The only one I can find at the moment, is Browser Pong which simulates a game of pong played with your very own browser windows. You can try it out right now after the jump, otherwise, watch the video example - in fact I recommend both as there are some neat little tricks you can do for some kicks and giggles.

Play Browser Pong!
Watch the video demonstration here


Hope you've enjoyed this brief look at Nexus Productions!

Nexus Productions - Day 1

I started my work placement at Nexus Productions today - exciting stuff as I got to meet the team and familiarise myself with the studio I'll be working at for the next five weeks. One of the big hurdles to overcome, however, is learning 3D Studio Max as it is the main CG software Nexus uses. Its certainly a separate beast from Maya as navigation, menus and hotkeys are all mapped differently. However, the two do share similarities with familiar terms with Graph Editor and Material Editor (aka hypershade) with mental ray settings returning.

So today, I set out learning the ropes of Max with some tutorials to get accustomed to the interface. I created a set of dice, as a sort of homage to our first Maya tutorials, where I've also modelled a toycar which significantly helped me learn the basics of modelling in Max - extruding, edge loops, vertices etc.


Max has the intriguing feature of using Modifiers when modelling, which essentially acts like a layer system similar to Photoshop. Modifiers affect things down the list hierarchy, where visibility can toggled to hide/reveal any changes to the model in a dynamic fashion. For example, a Symmetry modifier can mirror a current mesh object, which can then be easily turned on and off whilst continuing to work with the model. Max also likes to give different colours to newly created objects, so forgive the wacky colours below.


Its still early days yet with much to learn, but there are some nice features in Max which I'm slowly discovering.

Other than that, things are a little quiet at the moment as there are only a few minor projects going on. Hopefully, things will pick up as some bigger projects come down the line. I intend to make a post showing some of Nexus's previous work when I have a moment, so look out for that. Otherwise, back to Max for me!

Maya - Matchmoving

In this workshop, we're beginning to look into the process of matchmoving with Maya - effectively blending live-action scenes with CG elements.

Here, we took a static image as a starting point. Without any prior information to the actual image or focal length settings, aligning the camera is a tricky yet integral part of the process.


Modelled Set
Once the camera is aligned, elements in the scene had to be modelled in order to achieve correct information with lighting, shadows and reflections. We then proceeded to add our CG element to the scene, an orrery, as well as some random spheres to test elements within our set such as the shadows and reflections.


Final Composite
After rendering out several passes (shown below), the shot is composited together to form the final scene. Note the integration of the orrery to the scene, the shadows on the sphere under the walkway, as well as the reflection to the far right sphere towards the back.


Various render passes
By rendering out different elements of the shot separately, these can then be effectively controlled and composited within the scene by adjusting any individual values. These were rendered out with render layers, and later composited in After Effects.


This ends the beginning introduction to matchmoving, where I believe we will continue by dealing with moving elements in the next workshop.

Maya Dynamics #09

Some more dynamics before the holidays, introducing soft/rigid bodies with a few scenarios; a chain, Newton's cradle, earring and catapult.


I tried increasing the gravity magnitude setting as it seems to work better in creating less floaty movements, though in hindsight I think I could have pushed it more for some of them. Newton's cradle also took some tinkering to get right, as it seemed to have a mind of own when the balls struck one another. Other than that - it was an amusing case of trial and error to get the catapult to hit its target.

Turntables for Tribe 17

Got round to creating turntables for the main three characters of Tribe 17, with Tribe A, B and C. Unfortunately, the latter two videos are not in HD yet (as vimeo only allows 1 HD video a week), but they will become HD sometime later in the next week or so.


Mental Ray - Caustics, Materials, Physical Sun, Portal Lights, HDRI

A lengthy post coming up - looking at Mental Ray with Caustics, Materials, Physical Sun and Sky, Portal Lights and HDR images.
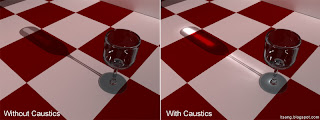
Caustics
Caustics is the name given to the phenomenon of bright hot spots when light is refracted through materials such as glass or water. In this case, applying the caustic setting (along with final gather and global illumination) helps to simulate this effect.
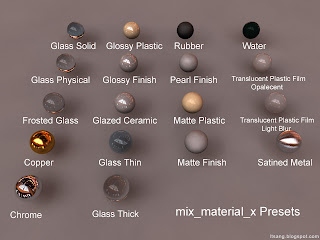


Mix_Materials_X
Mental Rays default mix_materials_x has a number of preset settings that work quite effectively. The versatility of the material is impressive especially considering the fact that these presets can be combined and mixed together for entirely unique results.


Physical Sun and Sky
Mental Ray has the option of using a Physical Sun and sky to light a scene - here we delve into some of the finer settings.

With a default sun and sky, the horizon line must be adjusted to match the scene.


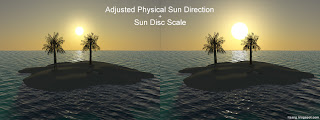
Adjusting the physical sun direction will simulate different times of day, where the sun disc scale attribute can be tweaked to change the size of the sun.


A early afternoon lighting is achieved by rotating the sun by a rough value of 135.


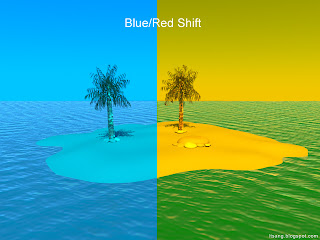
If necessary, the hue to red/blue can be tweaked to match specific scenes.


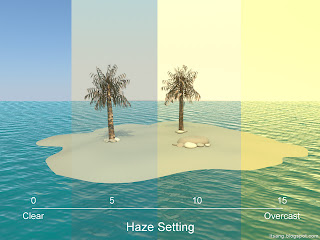
Where the haze setting can be adjusted to create a clear day or an overcast one.


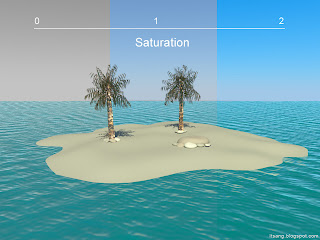
Saturation levels can also be tweaked to a desired effect.


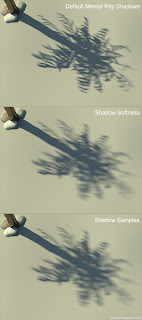
Shadows created by the physical sun and sky can also be tweaked. With the example below, increasing the softness and number of samples can help achieve a softer look to shadows while maintaining quality.
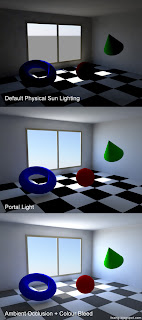


Portal Lights
Mental Ray's physical sun and sky do not work so well with interiors. However, this can be amended with the use of portal lights to help light any interior scenes. As such, ambient occlusion and colour bleed can be used to have colour bounce of surfaces.


HDR (High Dynamic Range) Images
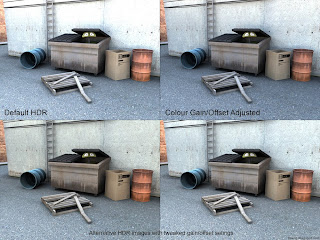
HDR images used for lighting can provide a much greater level of detail to a scene, particularly with reflective surfaces. Often, it alludes to the world outside the scene with a chrome ball type reflection.
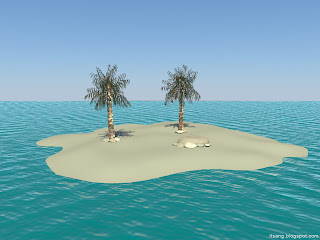
Base scene


Tweaking colour gain and offset values is integral to achieve desired results when using HDR images. While it may not be noticeable in the examples below, different HDR images were used to experiment with gain and offset values.

Maya Dynamics #08

This week, we also continued with some more Maya dynamic tutorials with particles. Here we are controlling goal weights with some expressions to allow the mud to slide off the golf ball. The later part of the video shows the goal weights being controlled by a locator control. And finally, we looked at using sprites as particles to create a sparkle effect.

Tribe 17 - Final Animation

Transcription project is over! I am proud to present Tribe 17 - performing a ritual to attract fireflies which in turn power themselves

Final Animation


Its been a very challenging project that I've certainly learnt a lot from; namely from character design, rigging and animating in Maya. Unfortunately due to time constraints, some scenes did not make it into the final cut. Namely a opening sequence moving slowly amidst the junk piles to better establish the scene of the ritual, as well as resolving the animation in terms of context with a firefly awakening a new tribe robot amidst the junk.

Despite this, I’m happy with what I have achieved in the 10 weeks that this project has taken. There may be opportunities to return to this project in the future, but in the mean time, the skills that I have learnt and developed in this project has been invaluable to me.

Catch a look behind the scenes with the art of publication below, as well as the technical paper which outlines the stages in the rigging process in more detail.

Art of Tribe 17
Art of Tribe 17

Technical Paper
Tribe17 Technical Paper Leo

Enjoy!

Turnaround - Tribe A

Turnaround for Character Tribe A

Update + DVD Cover/Label

A quick update as things are pretty tight around here. Scenes are off rendering in the background and well, hopefully everything will come together in the end. In the mean time, I'm taking care of the other tasks still left to do.

Here is a quick render of a scene in progress, note that things are unsmoothed in this image with no matte painting either.


I've also put together a DVD label and cover ready for submission.


Back to work!